Thursday, December 30, 2010

Zesty Cheese Wafers

These zesty cheese wafers are a family recipe that my mom use to make every Christmas and my husband requests each year. And even though the 25th of December has come and gone, they're great for New Year's Day snacking. No, they're not particularly healthy. In fact, they are such a delicate cracker-like wafer, you can't really make any substitutions or they just won't come out right. This is one of the few recipes in which I use store bought white flour to make. But for once a year... they're deliciously worth it!


Zesty Cheese Wafers
(Makes about 9 dozen)

1 cup butter
1 lb. good quality sharp cheddar cheese, finely grated
2  1/2 cups flour
1 tsp. salt
1 tsp. cayenne pepper
1/2 cup rice crispies
1 cup pecans, finely chopped

Cream softened butter and finely grated cheese until very smooth - at least 10 minutes. This will really give your mixer a work out, so don't attempt this if the motor gets hot easily! (My Kitchen Aid does fine.) Sift flour, measure again, and resift with the salt and cayenne pepper added. Stir into creamed butter and cheese, then add rice crispies and pecans, gently stirring until blended - do not over beat.

Turn out onto surface and divide into 3-4 segments and roll out into a log about 1 1/2 inches in diameter. Wrap in wax paper an chill thoroughly - overnight is best.


At this point, if you'd rather not bake them right away, you have the option of freezing the logs in a zip lock freezer bag and make them whenever you need some for guests (or yourself!). When you're actually ready to bake, slice each wafer 1/4 inch thick and place on an ungreased cookie sheet. 


Do not let the wafers touch or be too close together because they will expand just a bit. Be sure to save the ends and bake them, too, so that you can snack on them while you make these.


Bake at 375 degrees for about 15 minutes or until very lightly browned. Do not over bake or the cheese flavor will change and they'll taste almost burned. 


I think I'm going to need to make some more!


Tuesday, December 28, 2010

Reflecting On Christmas Past...

Another Christmas has come and gone, and with it, expectations and realities as well as joys and sorrows. As much as we'd like to create the perfect celebration, it just isn't going to happen this side of heaven. Life happens and it doesn't take a holiday even though we'd like it to. There are just things that can not be controlled or manipulated to meet all our expectations. For example, one blogger lost her home this season to a fire. Completely burned to the ground. A friend here on the mountain, lost her husband Christmas day due to health complications. He passed on quietly in his sleep, but left his family behind, including two school-aged children.


I'm not writing this to be gloomy or to complain, but some of us did not have the Christmas celebration we had expected and hoped for. We read about ideas and see images on the internet (like blogs!) and TV or store catalogs, then we imagine our own family sitting around picture perfect trees and stunningly decorated rooms. Everyone is getting along splendidly and nothing goes awry. Oh, and add in a beautiful snowfall and fire in the hearth and you just about have it all, right? 

Reality check.

Did anyone have ALL these things this year? Not me. And if you did, how many years in a row has all this fallen perfectly into place? Zero over here at my homestead.

Because of our expectations verses reality, many will find that disappointment, bitterness, or even depression can take root in the days following Christmas. I sometimes wonder if that's part of the motivation behind so many New Year's resolutions; people deciding to "correct" what went wrong. And while it's not a bad idea altogether to work to make some things better, if your goal is to make next year perfect, it ain't going to happen! 

The real secret to a successful Christmas is...

• learning how to roll gracefully with the unexpected 

• making memories of the mishaps and laughing at them (and when you can, capture it on the camera!)

• putting others and their needs and dreams before your own

• spending glorious time worshiping the Savior and His birth

• remembering that there is always next year to celebrate, either here or in heaven!

Certainly there is a more to Christmas, but having these attitudes means you won't be nearly as disappointed when the holiday is over.


Sometimes you really do need to make a calculated change in your celebrating. For example, if you waited until Dec. 22nd to shop and mail a package going across the United States and found yourself totally stressed and grumpy with the family as a result of poor planning, that usually can and should be changed.


Now is the best time to reflect on Christmas 2010 and make a few notes so that Christmas 2011 will be different in as much as you can control. Trust me, if you don't do it now, come February, you'll have a hard time remembering exactly what you want to do differently.


Take a few minutes today to write out a list of things that went well and things that didn't; some notes about what you want to do differently next year; journal some goals for 2011. Be specific where you can, because now is when the details will be fresh in your mind. If you're having trouble getting started, try using Organized Christmas's Holiday Values Worksheet. Then when you're all done, stick these notes in the front of your Christmas Planner so you'll see them first when you open it up later in 2011. You'll really be glad you did! It's helped me a lot over the years and I'll be making my own list today as well.


Wednesday, December 22, 2010

Merry Christmas, From Our Homestead...

To yours...


We wish you the joy and peace of knowing Jesus Christ as Lord and Savior,
and as you reflect on His coming over 2000 years ago and His coming again
may your heart be full and blessed!

"Arise, shine; for your light has come, 
And the glory of the LORD has risen upon you."
~ Isaiah 60:1

I wish that I could welcome each and every one of you into our home during this Holy season and have a cup of Christmas Tea and a long visit. You've blessed me all year long with your sweet and thoughtful comments and great ideas... it would be such a treat to just spend an hour or so with you and get to know you better! But since that isn't possible in this lifetime, I'm looking forward to 2011 and all that fun blogging to come! Enjoy your family and make some great memories!

Merry Christmas,

Monday, December 20, 2010

Homesteading Christmas Gifts

Are you like me... waiting until all the Christmas baking, decorating, gift-giving, and outreach is completed before it crosses my mind that my husband wants to know what to get me for Christmas? (And it's just occurred to him, too?) I try to convince him (and myself) that there's nothing I really want or need; we've already spent too much money; I know he loves me and doesn't need to spend money to show me, etc.


He's not convinced.


Photo Credit: Sarah Parrott


A few ideas would be nice. And if I'm going to pick something, it's probably going to be an item that is practical and useful. I'm just not a diamonds and perfume kind-of-a-gal. But a homesteading item? Now that speaks to me!


My affiliates have some awesome, top-notch products that I can personally recommend because I have and use these items myself (and yes, I make a small commission when you purchase through my "shop" page) . I also have some great advertisers that have products I like to use. So if you need to pass on a list to your own spouse, here's a few items you might consider...


VitaMix makes the last blender you'll ever need. Seriously. If you want to see some video clips, just click here and then click the VitaMix link.


An Excalibur dehydrator is a perfect investment for your food preservation and storage. And it does so much more than just dehydrate food; it's excellent for making homemade raw milk yogurt! For more information of what you can do with one of their dehydrators, click this link and select the next link for Excalibur. 


USA Emergency Supply has an entire website filled with great gifts for the homesteader who is looking to store food or prepare food in a "less-than-ideal" situation. You just can't wait until you "NEED" these items; you need to have them before hand


I've heard a lot of gals say that they want to use Tattler Lids, but it would be too expensive to buy a lot at once. Now's the perfect time... tell your spouse you'd like a few boxes for your Christmas gift!


Jimmy Pickles has some great items for keeping you organized on your homestead in style; perfect for stocking stuffers or as a stand alone gift. My wristlet key chain is perfect for when I need to be out and about without my purse (and it makes it easier to find my keys when they are in the purse!). Don't forget that she's got lots more... go take a look!


Okay, so what's on my list this year? I can think of a few things...


A solar oven perhaps.


Or soap making supplies; especially molds.


And then there's the cadillac of pressure canners; an All-American Pressure Canner.


Oh, yes. One more item. Some Nite Gard Predator Controls. For the bee hives, of course.


Speaking of bee hives... a gift certificate from Brushy Mountain Bee Farm would be awesome! There's no end to the items a gal could want over there!


Finally, last, but not least by any means... books. Lots of homesteading books! Every homesteader needs a library of hands on reference material. Don't count on the internet as being your only source because it just isn't that reliable. Besides, you can't wag it out to the garden or barn with you and unless you have a lap top, you can't crawl up in bed with it! My Amazon Bookstore is always open and any item purchased on Amazon gives Homestead Revival™ a small commission as long as you enter their site through my blog page by clicking here. (It doesn't have to be just one of the books I'm recommending). 


I think a homesteading girl would love any of these, don't you? And by the way, thank you for shopping through Homestead Revival™. Your purchase helps me more than you know!

What homesteading item is on your wish list this year? (I might want to add it to my own!)


Sunday, December 19, 2010

Advent: Week 4

"How lovely on the mountains
Are the feet of him who brings good news,
Who announces peace
And brings good news of happiness,
Who announces salvation,
And says to Zion, "Your God reigns!" 
~ Isaiah 52:7


Mt. Zion, Israel
Photo Credit: Marion Doss


"Then I saw a new heaven and a new earth; 
for the first heaven and the first earth passed away, 
and there is no longer any sea.
 And I saw the holy city, new Jerusalem, 
coming down out of heaven from God, 
made ready as a bride adorned for her husband.
 And I heard a loud voice from the throne, saying, 
"Behold, the tabernacle of God is among men, 
and He will dwell among them, 
and they shall be His people, 
and God Himself will be among them,
 and He will wipe away every tear from their eyes; 
and there will no longer be any death; 
there will no longer be any mourning, or crying, or pain; 
the first things have passed away."
~ Revelations 21:1-4

Good news, indeed!


Friday, December 17, 2010

Simple Christmas: Little Things Make The Difference

One of the motivations behind a simple Christmas is the fact that it shouldn't cost an arm-and-a-leg to create a beautiful experience. And beautiful it should be! This is the time we celebrate the most important event in human history aside from Christ's crucifixion and resurrection.

In addition to frugal, Christmas decor should be easy to pull together. Beauty is everywhere, including the Dollar Tree (our local $1 store). But our tendency is to over do it; to go overboard, and thus our attention is distracted from focusing on one or two things that are truly lovely and we don't really see the beauty! And in this day and age of information overload, our brains need to rest... simple beauty is food for the soul!


For example, we all like to give food gifts during the holidays. But how many of us take the time to make the package really pretty? Think of the wrappings as part of the gift to the person you love. 

This tin cost $2.50 from a drugstore. I choose it because it had a simple pattern that has always been a favorite of mine and kind of a signature design that my friends will recognize as uniquely me. I plan to fill it with some wonderful cheese wafers, a family cracker recipe with sharp cheddar cheese and herbs. (I avoid giving "sweet" gifts" since everyone needs a break from these during the holidays). The tin has snowmen inside on the bottom with a bright blue print, but it won't be seen when lined with white tissue.


Avoid the tendency to mix too may patterns. Let one pattern be your focal point. If you use a solid color tin, then consider using a beautifully patterned ribbon. But don't rule out using a solid tin and a solid ribbon. this can be just as stunning if the two are well coordinated. Play it up even further with a great tag! And did I mention my love of brown craft paper; along with the gingham, it just says 'home'

Next, I bought a a couple of rolls of white satin ribbon with a bit of soft wire in the edges. I purchased these in different widths and they will be one of the elements that tie all my decorations together for the season. A large bow at the top of the tree, my wreath, and around the narcissus when they are getting leggy and need support. This same ribbon was added to my packages so that those who visit my home feel they received a part of our actual Christmas celebration since it ties into the decor. And I love the big bow effect... it's just so... elegant. If you don't know how to tie a really good bow so that it is straight, there are books at craft stores, such as Michael's, that have instructions for bow tying. (Or click HERE). Take the time to learn because it really makes a difference!


I did make one pricy investment several years ago that has been well worth the purchase - an embosser with the phrase "Kitchen of Andrew and Amy Walker" on it. I use this year 'round when giving food gifts and it makes a lovely touch. My favorite labels are copper colored and they go with just about anything. I just emboss and stick them on anything I make. In this case, I used card stock and cut around the edge with some scissors I had in our school supplies, punched a hole (invest in a small diameter whole punch!), and tied it with kitchen string.


For a final touch, add some greenery to really make it look like Christmas, but don't use something artificial. Go out in your yard and use some herbs that you already have (rosemary is my favorite), cut a small pine twig off a tree, or perhaps some holly. If you don't have anything like this, ask a neighbor if you can cut from their yard and make a note to yourself to plant something for this purpose next year!

The front door wreath is a perfect place to simplify and yet, create a beautiful entrance. Each year, I receive a lovely fresh green pine wreath from a friend. It comes with a red bow, some pine cones, and red plastic berries. This year, I stripped it down to the greenery with the exception of the pinecones and added a white bow in keeping with my theme. Looking good.


A $2 ornament from Pottery Barn with our family initial created a focal point for the wreath and some understated bling.


It still seemed a bit bare and lacked excitement, so I went out to the yard and cut some greens: juniper and boxwood from two different varieties (one was varigated). I didn't wire these in, but I just stuck them in the wreath (very simple, indeed). Much better, but it still doesn't look finished.


A few more pinecones... Ahhh, yes! That's the best! I actually used some floral picks to insert these additional pinecones. And because several looked dull, I sprayed just a hint of glitter on them.


This year, simplify your Christmas by making it easy, natural, and in keeping with "less is more". Instead of decorating every single nook and cranny in your home, let the little things make the difference and add one or two accents that really grab your attention or subtly highlight something that is already a focal point and make it say "Christmas". It will take less time to put up, and less time to take down, which is always a welcome benefit. But it will also create a soothing environment and hopefully one that will draw your heart closer to God as you enjoy the beauty around you!


Thursday, December 16, 2010

Holiday Hospitality And A Warm Cup Of Cheer

A few years ago, I started helping my daughter set up a hot beverage bar at her school as a fundraiser for charity. It finally dawned on me that this would work great for drop-in visitors that stop by the house during the holidays. So I set about creating one for my own kitchen, mostly with items I already had around the house. Below I've included pictures from the last two years and you can see that items on the trays differ depending on my mood and what I have on hand.

A cute container with peppermint sticks (a must have for hot chocolate!)...


And a jar full of marshmallows and a scoop...

Three cute shakers I found at a store one day for nutmeg, chocolate, and cinnamon (the 'adult' must have items for coffee!)...

Coffee syrups for flavoring...


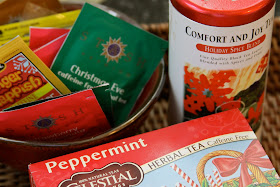
A selection of hot chocolate packets and teas in holiday flavors as well as some all time favorites...


Don't forget mugs, spoons, cute napkins, a sugar bowl, and honey...


If the door bell rings, I just pull out the creamer and add it to the tray.


For hot water, I use an electric tea pot that heats in less than 3 minutes. And for coffee, I use a coffee pot of course, but I also have a commercial grade thermos with a pump spout that I use if I want to keep it hot and fresh all day long ...


Each morning, I just add fresh water to the pot and coffee in the thermos. Visitors often can't stay long and this way I can offer them something right away to warm them up before they are out the door again. And if they can't stay, I keep hot/cold cups with lids for a "to go" treat. Any unused water can be used in something else when I cook and the extra coffee... well, I can always drink one more cup, right? Besides, you don't have to fill it to the top, just make what you think you'll need for that day. Oh, and if you don't have a tray, just use a cookie sheet and add a placemat to it in order to cover any "stains" it may have.

Finally, I like to keep a plate of cookies or a sampling of other Christmas treats that I can offer, so I have these on hand and just cover them with plastic wrap to keep them fresh until visitors arrive. I just refresh the plate when needed.

This really is so easy sometimes I wonder why I don't do this year round?


Tuesday, December 14, 2010

A Blossoming Homestead Interview

Today at A Blossoming Homestead, Megan Jenelle is hosting another interview from her series A Word From the Wise featuring little ol' me on her blog. It's very flattering that she considers me "wise" and certainly something I hope to aspire to! (Is that what all my gray hair is for? Wisdom?) For those interested, you can visit and check out the rest of her site as well. 


Thanks, Megan. It was lots of fun!


Organizing Christmas Cards

There are probably hundreds of ways to display Christmas cards, but I have a new favorite. Since I receive so many photo cards, I want to enjoy them for most of the year. I hate putting them away, never to be seen until some day years down the road. And throwing them away would seem irreverent. So leaving them up allows me to recall memories, pray for them, and think about how old I'm getting (because would you look at how old their kids are now!!).


I had my husband make this semi-rustic rack for me last Christmas season which hangs in our laundry/mud room all year long (we go in and out this door most of the time so it's an ideal location to seem them often). I got the idea from some magazine, but they used the mattress springs from an old antique crib. Well, I have just that sort of antique crib, but I wasn't about to cut it up to make a card holder, so we improvised. The wire I used can be purchased at a farm supply or hardware store (sorry I can't remember what it is called - if I find out, I'll edit this post with an update). My husband made a simple wood frame, added the wire, and a couple of hangers.


Being the perfectionist that he is, the wire was inserted into a slit just like a real frame. You can kind of see the groove in the above photo (He wanted to fix the miter joint that you see above, but I put my foot down and told him I wanted RUSTIC, not Pottery Barn! I still need to take some sandpaper to it and a bit of antiquing.). If you are doing this yourself, I certainly think applying the wire directly to the back of an old frame would work fine. Wouldn't it be cute to make one of these with an old ornate thrift store frame repainted and with some chicken wire? Very shabby chic! Mmmm... now my mind is thinking of all kinds of styles this can be adapted to. 

Since this hangs in my laundry room, I used clothes pins to secure the pictures to the wire. The photos can be easily moved around as more arrive. Sometime later in the year (much later), this gets converted into a message board for birthday invitations, reminders, and notes.


So, how about sharing how you display your cards?