.

Tuesday, May 15, 2012

The Garden Plan

If I'm going to spend so much time in my garden, then perhaps I should show you what I'm up to! Sort of...


I've been taking pictures of my garden the last three years and every now and then I've posted a photo or two. At this point, I think I'll create a bit of suspense... I'll wait to "unveil" it when I get it a bit more "finished". (A garden is never REALLY completed, is it?). In the meantime, I'll keep showing your little snippets. And how about a map of it? Be sure to view the Garden Legend just below the map in order to identify each item.


So let me tell you a bit about what you CAN'T see...

This isn't a flat level garden. Remember... I live in the mountains! Those green areas with squash, potatoes, tomatoes... each of those are a different terrace, which means little retaining walls that need to be built. Oh, and the raised bed boxes are on another terrace.

Now you know why this is taking so long! I'm going to have to add masonry skills to my repertoire! I've started digging out the foundation for one and the block is all over the tomato area. And in the meantime, I still am planting and raising veggies. (By the way, I rotate those three green areas each year.)

The raised bed boxes are where I grow all my greens and other tender or smaller sized plants: basil, cilantro, lettuce, chard, peppers, radishes, broccoli, cauliflower, cabbages, peas, etc. I don't have all 8 raised beds in place yet, but getting there! Each year we add a couple more.

The bees live tucked away in the upper left corner. You may be thinking that a beehive in the garden would fall into the category of "two's company, three's a crowd". But based on my own experience, I have found that bees and beehives are a lovely fit! However, because I live where rogue animals would love to have honey as a treat after dark, fencing around the hive is pretty much a necessity. (Have you ever seen pictures of a hive knocked over and destroyed by a predator? It's a sad sight, indeed! Trust me... you don't want to go there.)

Thankfully, the brown wood fencing was already in place. And since I planned to put my goats in a paddock in the garden, their corral fencing would secure a third side. I left one side open, but if necessary, I can fence this off, too. A cypress-like tree (this one is actually a Japanese Juniper, but it looks like a cypress; the other three really ARE Italian Cypress), a couple of bay trees that will be pruned to large shrubs, and a rosemary plant will act as winter wind breaks on the north side of the hives. These are all evergreens that are safe to eat should the goats manage to get their heads through and consume some a lot! (They just decimated my roses when a little someone didn't get the gate closed all the way.)


Most of the items on the map are in place, but I didn't mark all the bee friendly flowers that I've added or will be adding. My sweet friend, Gail, sent me a packet of seeds from Botanical Interests called "Save The Bees". I'm planting them on the other side of the fence, right in front of the hives! Lavender (another bee favorite) has been interspersed among the espalier apple trees and annuals such as zinnias and chrysanthemums will be scattered throughout.

I still have some plants waiting to go in the ground, as well as a few spaces that still need to be filled with something special, but the journey is half the fun! And I'm getting a really good farmer's tan!

What would you add that I haven't thought of? I'd love some input!


Monday, May 14, 2012

Barn Hop #62

Welcome to the Monday Homestead Barn Hop where you're invited to link up your blog with your very best post of the week; something happening at your homestead or something of interest that will help benefit fellow homesteaders. Plus, each of the 3 Homestead Barn Hop hostess selects her favorite post of the week to highlight the following week. So be sure to visit all three blogs because the "Featured Homestead" could be YOURS!


This week I'm featuring Nancy from... 


Nancy had a great post on doing a soil test from your garden. I'm very interested in knowing how nutrient rich my own soil might be and this post really caught my eye! If the soil is depleted, your vegetables will be, too!


Living in Vermont, Nancy was able to send her sample to the University of Vermont for only a $14 fee. Very reasonable in my opinion! You could certainly do a home test sold over the counter, but according to the Contra Costa Master Gardeners, these will only test for N, P, K, and pH. (Nitrogen, Phosphorus, and Potassium). However, a professional or academic lab can test for macro and micro nutrients for a few dollars more and should also provide literature for interpreting the data. I'd say that's well worth the investment!

Nancy also included some great instructions for getting an accurate sample. If you're interested in such things, I suggest you take a quick look...


Join The Barn Hop!
and Amy @ Homestead Revival...

...invite you to link up and share your homesteading adventures!

1. Write a blog post about what's going on at your homestead or a post on something you're learning or an item of interest that will benefit the homesteading community. Be sure to add the red barn button and link back here so others can join in the fun.
2. Come back here and enter your information in the Linky. Please be sure to link to your actual post (click your title and then copy the URL above) and not your home page so those participating later in the week can find your post easily.

3. If you don't have a blog, leave a comment and tell us what's going on at your homestead!

Please Note: As hostesses of the Homestead Barn Hop, please understand that we reserve the right to remove any links that are not family friendly. While this may be subjective, we will err on the side of caution in order to keep our blogs appropriate for all readers. Thank you for your understanding!


Occasionally there is a problem posting due to glitches in the internet or the Linky Tools. If you have difficulties or see that your post is removed and it follows all "family friendly" guidelines above, please wait a little while and try re-posting. We're sorry for any inconvenience this may cause, be we do not have absolute control over the internet. Thank you for your patience and understanding!


Friday, May 11, 2012

I'm Out In The Garden...

And yes... I'm still around and haven't fallen off the face of the earth. Springtime on a homestead is always busy. I've sat down to write a post several times, but I can't seem to get one finished for the life of me! This I can say with confidence... it's not dull around here! The rattlesnake that made his last visit to the yard today (before succumbing to a sudden death) is just one example of the heart stopping suspense we've experienced recently. The good news... I think I have the mice under control, though the bobcat has still eluded us.


Potatoes and tomatoes should be in the ground tomorrow, along with a gazillion zinnias, a few squash, and maybe the peppers and eggplants. And hopefully, the new chicks will move out of the two brooders in the house and take up residence in the coop. Of course, the new chicks out there will have to move over, but there's room for all!


I have been falling into bed exhausted every single night, waaayyy past my usual bedtime. But it's all good! I wouldn't have it any other way. And hopefully, I shall return to posting SOON! Lord knows I've written about 10 posts in my mind already. Now if I could just get them typed out...


Tuesday, May 8, 2012

Winner: Preparedness Challenge #34

Thanks to everyone who participated in the 34th Preparedness Challenge that is held the last Saturday of every month! I'm thrilled that so many of you have continued to add to your food storage, gather emergency supplies, and make your homestead more sustainable month after month! I'd love to hear some testimonies from you about how a little bit put aside every month has made a difference!


The winner of the 5 gallon water barrel and drum pum from the Preparedness Challenge sponsor, USA Emergency Supply, is...

Trina!


Congratulations, Trina! Please contact me so we can get your items on their way to you. (You'll find a link to my email on the right side bar by clicking "Contact: Email" - be sure to scroll down a ways!).

Start a list now for the May Preparedness Challenge on Saturday, May 26th. If you're like me, you need to be PROACTIVE on some of the more "challenging" items. I find food storage and sustainable living pretty easy, but emergency items are often a bit harder. However, I've already scored big on this for the next challenge! I can't wait to show you what I have ready to go in an emergency! Be sure to stop by to find out what it is.

Monday, May 7, 2012

Barn Hop #61

Welcome to the Monday Homestead Barn Hop where you're invited to link up your blog with your very best post of the week; something happening at your homestead or something of interest that will help benefit fellow homesteaders. Plus, each of the 3 Homestead Barn Hop hostess selects her favorite post of the week to highlight the following week. So be sure to visit all three blogs because the "Featured Homestead" could be YOURS!

Katie of This Chick Cooks had a really easy and unusual recipe for Roasted Chick Peas that looked awesome (which I hope to make today!). I confess, I'm drawn to gluten free recipes right now since my own Katie (oldest daughter) is currently on a gluten free diet. And then there's the whole legume thing... I'm always looking for creative ways to incorporate these into our diets since they're inexpensive and often better for us than the alternatives. 


If these are as good as the comments say, I may be in trouble! I like salty snack things. Does anyone grow chickpeas in their garden? Be sure to note her tip for cooking chick peas in the slow cooker (click her link within her post). 

Join The Barn Hop!
and Amy @ Homestead Revival...

...invite you to link up and share your homesteading adventures!

1. Write a blog post about what's going on at your homestead or a post on something you're learning or an item of interest that will benefit the homesteading community. Be sure to add the red barn button and link back here so others can join in the fun.
2. Come back here and enter your information in the Linky. Please be sure to link to your actual post (click your title and then copy the URL above) and not your home page so those participating later in the week can find your post easily.

3. If you don't have a blog, leave a comment and tell us what's going on at your homestead!

Please Note: As hostesses of the Homestead Barn Hop, please understand that we reserve the right to remove any links that are not family friendly. While this may be subjective, we will err on the side of caution in order to keep our blogs appropriate for all readers. Thank you for your understanding!


Occasionally there is a problem posting due to glitches in the internet or the Linky Tools. If you have difficulties or see that your post is removed and it follows all "family friendly" guidelines above, please wait a little while and try re-posting. We're sorry for any inconvenience this may cause, be we do not have absolute control over the internet. Thank you for your patience and understanding!


Friday, May 4, 2012

Watering Bees Beautifully

Fridays... when most of us unwind and relax a bit. Me? I find myself drawn to Pinterest. Seems that I relax by perusing beautiful pins... either new pins or revisit some of my own pins that I've collected over the last year. Such eye candy! And a LOT of great ideas!

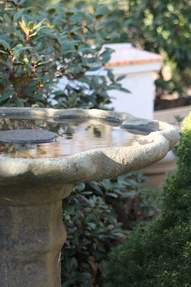
Like this one from Melissa of Tilly's Nest...


Honestly... is that beautiful or what? Be still my heart!

Melissa writes a chicken blog, but recently she's begun a new adventure with bees. (Next she'll probably get a goat! Homesteading is kind of addicting like that!) Her new bird bath is ready and waiting to serve as a drinking bowl for her small buzzing friends, complete with a little landing area right in the center (for bee safety of course - no drowning victims, please!).


Frugality in homesteading is always important, so of course, this should be considered when making a decisions. Kudos to Melissa for finding her bird bath on clearance at her local garden center! It makes her new bee waterer that much sweeter!


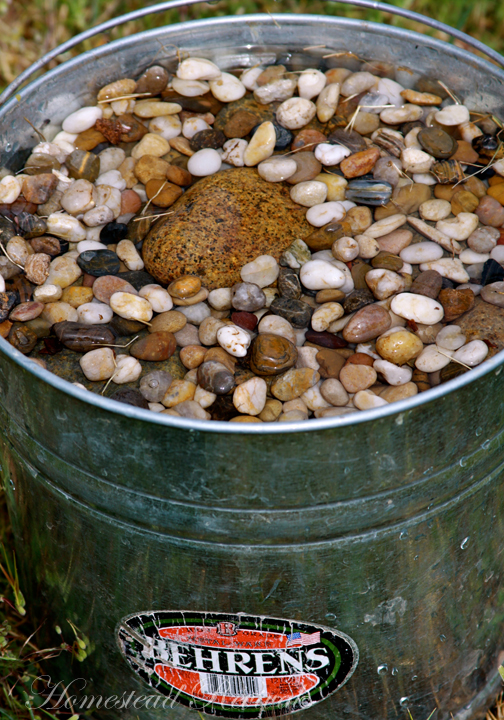
Now... compare her lovely watering pool to my own. I started with this pail of rocks...


While having rocks for landing on is good, I found that there wasn't enough landing area in this set up. So I added some smaller rocks to fill in the voids...


In this situation I found that the water level dropped below the rocks too quickly and then my little bee friends couldn't get to any water at all! The pail was just way too deep.

Finally, I used a water heater drip pan filled with rocks. This worked much better as there was lots of surface area for bees. I've since removed a few rocks and added some floating pieces of wood. It definitely does the job, but lovely? Not a chance.


Let's review... there's:

• beautiful, but not very practical
• practical, but not very lovely to look at
• beautifully practical in every way!

Given a choice, why not go for the beautiful AND practical? After all, we were created to enjoy beauty so that it would remind us of the beauty of our Lord and that we would not forget all beauty emanates from Him.


"... if the beauty we behold on earth has its root and origin in god, there must have been beauty in God from all eternity. What, then, is the beauty of God? ... God himself is the absolutely original pattern of all other beauty...


"Now how does this infinite divine beauty relate to our longing for beauty? I do believe that deeply rooted in every human heart is a longing for beauty... Is it not because we long to behold and be a part of beauty? We crave to be moved by some rare glimpse of greatness. We yearn for a vision of glory." ~ John Piper, Jesus Is Precious Because We Yearn for Beauty


"One thing I have asked from the LORD, that I shall seek: That I may dwell in the house of the LORD all the days of my life, To behold the beauty of the LORD And to meditate in His temple." Psalm 27:4


So if you were a bee, which would you choose?


I thought so. Thanks, Melissa, for the inspiration and reminder that even in watering bees, we can reflect beauty!

Saturday... local rummage sale... I'm on the hunt!


Wednesday, May 2, 2012

Seed Starting: Equipment

Starting seeds indoors really isn't all that difficult once you know a few important bits of information, but because it would make for a really long post to include it all in one writing, I am going to break it down into smaller sections. It's easier for later reference and it's easier for me to get my brain around something new. Hopefully, it will be better for you as well.

So let's talk equipment. Like most homesteading ventures, you can go ultra frugal, super grand, or something in between. I usually find that the extremes create frustration... either because it doesn't work like it should or financially it takes all the joy out of the process. Typically, a modest investment in some good supplies will help you to succeed better than if you try to go "too cheap" and still last long enough to pay for themselves (if you shop around). The goal is to get the most bang for your buck, to only buy what you really need to be successful, and make do with what you can.


What To Buy

Trays. The black plastic seed starting trays are worth every dime as long as you don't overpay. I find that I move my seedlings around a LOT and if you have to move them one at a time, you'll be exasperated. Or if you try to use something too flimsy or with sides not high enough, they tend to fall over and get damaged. Trays can be purchased on line, but shipping costs are a bit high due to the size. I suggest looking around locally at garden supply centers, nurseries, and even big box hardware stores. (How I use these will be discussed in a following post in this series).

You'll find different kinds of trays, but I use two types almost exclusively and I highly recommend you have a good supply of both.


The first is a solid bottom tray with no holes. This is mainly for catching water under a second tray, but I also have used these for growing fodder for my chickens (that's another post someday!).


The second is what I call a lattice bottom tray. It has just enough to hold your seed cups but allows water to pass through when you don't want your seedlings in standing water.


There is a third type of tray and I do keep some on hand for onions and if you use soil blockers, they might be handy. This kind of tray has some slits in the bottom for draining, but more of a solid bottom otherwise.

You can use the trays with "cells", but keep in mind that plants grow at different rates - some will outgrow their cells faster than others. You also have the issue of removing them without distrupting the entire tray of seedlings. And you are limited on the size so that roots can only expand so far. I really don't use these and don't recommend them.

On the other hand, I DO recommend a plastic dome (the short kind). You only need it until they sprout, but boy does it make a difference! Yes, you can use plastic wrap and I've used plenty in my day for seed sprouting, but it makes me want to say words that are not nice. Moving on...


A frugal option is to use your cookie sheets with sides (or jelly roll pans), but when water accumulates, you'll find them harder to move to drain off the excess. For the price, the reusable plastic trays are a great investment.

• Heat Mats. This purchase requires a bit more of your investment dollars, but I feel it's highly worth the price. A heat mat is a flat rubber coated pad that goes under your warm season seeds to help create an ideal temperature for germinating. You can purchase a temperature controller for it as well, but for the most part, I have found it really isn't necessary as I have had much success without one. However, if your room is a bit warmer, you may need to invest in one since the heat mats typically raise the temperature 10-20 degrees above ambient room temperature. You don't want to cook your seedlings!


Water is not an issue for heat mats either; you can run a hose with a sprinkler on them if necessary (I've seen photos of Eliot Coleman doing this) as they are waterproof. Don't go submerging it, but if you're using a watering can and some of it spills on the mat, you can relax!

Heat mats come in various sizes, but I selected one that fit the space I intended to place it on which holds about 4 seed starting trays at a time. Think a bit beyond your immediate needs. If you think it's possible you might expand your garden, don't buy the smallest mat! On the other hand, if you buy something too large, it might not fit on your table or you could have some seeds on the mat but not under your grow lights. The mat and the grow lights should match in size.

Many people recommend using a heating pad or Christmas lights underneath. I've used the heating pad and had some success, but most heating pads are not the right size or large enough. An electric blanket can give you more coverage, but don't let it get too hot! Most seeds germinate between 65-85 degrees, so you need to mimic that as much as possible. Another concern is watering. I do NOT recommend watering your seedlings on a pad or blanket. This creates more work for you, but if you ruin the electric blanket, it might cost more to replace than the heat mat! A final consideration is of a fire hazard. Normally it's not typically an issue, but if you're using it around water, then that's a different story.

Since most people already have Christmas lights, you might want to give this a try, especially if you need to spend money on another seed starting item. You can always purchase the heat mat the next season to spread out your costs. Typically water resistant, a little sprinkling shouldn't be an issue, but I would not go hog wild with water around the Christmas lights.

• Lights. Is it possible to start seeds without grow lights? Yes. Is it easy? No. Even if you can get the seeds to germinate (some seeds actually germinate better in the dark), they will often get leggy without proper lighting. And depending on where you live and the placement of your windows, this could be a big deal.


The good news is, you don't have to spend the really big bucks on this purchase. Many garden companies sell grow lights on stands for upwards of $250 (for a standard unit - not a small table top variety that only starts a handful of seeds). A standard florescent shop light (T-12) will suffice, but for my set up, I found that two lights were needed for each shelf that I have. I also selected a shop light that had sides that curve down so as to direct the light toward the plants below and not just all over the room. And this has turned out to be a good choice. If your plants are going to be in a room where you spend any amount of time, you don't want an annoying light glaring at you all day long!

As for bulbs, some recommend special grow lights or full spectrum florescent bulbs, but a standard florescent bulb should work fine as well. It's not like your seedlings are going to live out their lives under the light. You just need it until they're large enough to transplant when the weather is accommodating. I chose to use Philips Natural Sunshine bulbs. I'm sure I could have used a cheaper bulb, and I'm not sure if I gained anything by going with "natural sunshine", but my seedlings are very happy!

Keep in mind, you'll need some way to suspend or hold your lights up. A bit of chain or blocks of wood will come in handy and won't cost much at all.


If you live where the sun is strong in the spring and you have southern windows, you might be able to just turn your plants daily, but watch that they don't start getting too leggy!

• Shelving. Once again, you need to match your mat and light to your shelf or table top. It won't do any good to have a small shelving unit if your mat is hanging over the sides. In fact, it's bad for the mat! A stand could easily be made out of scrap wood, a metal garage shelving unit, or even a folding table. Just be wary of using your good furniture since water could damage anything with a finish on it.


Originally, I purchased a metal shelving unit, but after two seasons, I re-purposed it for holding storage items. I found that it was way more than I needed (over kill) and not easy to move. It took me three years to find the right location for my set up, so each time it had to be taken apart. And since this is typically a seasonal item, I didn't want to set it up in a prime location only to have to take it down again later.

I found my perfect match in a little folding table we already had from our earlier homeschooling years. My mat and lights fit it perfectly, it's easy to move (I can do it myself without a hammer!), and it's low profile. I can even cover it with a cute table cloth if I so desire (I find an oil cloth makes it easier to wipe down when necessary).


For my lights, I just prop them up on blocks of scrap wood, but underneath, where I keep my cooler crops, I suspend the light by chains from the leg mechanism. I need to work on a "proper" light stand, but this is something that can be done frugally without much effort.

• Watering. I recommend two items: a spray bottle and a watering can with a small spout. This way I can mist the soil surfaces (for really small seeds and tender sprouts) but I also have a means of fertilizing or soaking pots from the bottom (watering can method). The small spout allows me to control the flow and not knock over tender plants. It's also a bit faster than misting if you can get by with it!


So there you have my top seed sprouting supplies. Everything else is something you probably have around the house - a fork, a small spade, a bucket, etc. In another post we'll talk potting options, soils, and things like that. But for now, you can consider your budget and which items you might want to invest in.

If you're inclined to give soil blockers a try, you will need to invest in some additional equipment. I have a couple, but haven't actually used them yet. I've chickened out (for various reasons). However, Stephen McGehee of The Southern Agrarian has a couple of great posts here and here. I am referring you to him for further instructions on that topic. Even if you don't think soil blockers are a fit for you, do check out his blog! (And someday, I'm going to get brave and give soil blockers a try!)

For those of you who are veteran seed starters, what is the #1 piece of equipment you wouldn't want to be without?

LinkWithin

Related Posts with Thumbnails