.

Showing posts with label Recipes. Show all posts

Sunday, August 10, 2014

Blackberry Pie! Oh, My!

Blackberries are ripe and harvest has commenced... joy from the fruit of the vine and thankful to the Giver of all good things.


Recipe can be found HERE. I substituted some arrowroot for the flour to thicken it up just a wee bit.

Amy


Monday, September 23, 2013

Apple & Walnut Oatmeal

Fall arrived early this year... blew in over the weekend in full force! And the Lord blessed us with a great rain to boot! This morning we woke up to the thermometer hovering just above the freezing mark. A warm hearty breakfast just seemed in order. One of my favorites? Apples and Walnuts over oatmeal. 


Apple & Walnut Oatmeal

2 cups rolled organic oats
2 cups milk
2 cups water
pinch of sea salt
butter
maple syrup
walnuts
apples
cinnamon (optional)

Heat milk, water, and salt in pan on stove until bubbles form around the edges. Pour in oatmeal, stir, and simmer until liquid is reduced to your liking (usually between 5-10 minutes). Meanwhile, chop walnuts and toast under broiler until golden brown, chop apples, and add about 1/2 T or less of butter to bowl and 1/2 - 1 T. maple syrup (adjust all to your preferences). 

Serve oatmeal over butter and syrup in bowls and top with apples and walnuts; sprinkle with cinnamon if desired. And enjoy!

For some FABULOUS organic walnuts, try Brit's @ Fillmore Farms. She's a Homestead Revival reader and their walnuts are the B.E.S.T.!!


Now, serve up a nice cold glass of fresh apple cider from the local orchards and you'll be feeling "fall-ish" inside and out! 


Friday, March 29, 2013

Kale & Cabbage Salad

This is not your mother's salad.


As much as we hate to admit it, most of us know really don’t eat enough vegetables. Well, most of the time anyway. When produce is coming out of the garden about mid summer, it may be another story, but what about the rest of the year?

For one thing, I know I need to eat more greens. My doctor recently advised me to stop taking calcium supplements, stating it actually did more damage to the heart than it did repairing bones. Seriously? Ughhh....

Common sense is starting to kick in, albeit a little slow. I realize now that it’s best to consume the entire plant as opposed to extracting and isolating individual components in it. As a whole food advocate, I’ve made it a practice to cook and serve foods from scratch, eating them as close to the way God made them as possible. But somehow I still thought it was okay to take those vitamins without question. I realize sometimes it is absolutely necessary, but most of the time, we'd be better off "taking our vitamins" through the foods we consume. Even though they may be less nutrient dense than years ago, they are still our best means for absorbing what is needed and flushing out what is not. 


So all that said... I'm on a mission to eat more veggies, particularly greens. I grew two varieties of kale this winter (Winter Red and Dinosaur), as well as Rainbow Chard, with the hopes of eating more during the dark months of mostly root vegetables and squash. And I did eat more than all the years prior! Just not as much as I had hoped. Most days I added a few leaves (along with some purchased spinach leaves) to smoothies and made a green drink. No juicing or cooking, just pureed in the blender along with the other ingredients.


I also was more consist about sprouting seeds and adding them to everything from salads to egg dishes, sandwiches, and anything else that sounded half way appetizing.

Then I found this kale cabbage mix at Costco and I got all excited until I realized it included a dressing I wasn't thrilled with. And why buy what I'm mostly growing? So I came home and made my own version substituting sprouts and green onions for chicory and making a homemade poppyseed dressing from ingredients I "approve".

Kale & Cabbage Salad
(no measurements are given as this is totally up to you and how many servings you want!)

kale leaves, cut into shreds
purple cabbage, cut into shreds
napa cabbage, cut into shreds
baby spinach leaves
broccoli florets, cut into bite size pieces
brussels sprouts, cut into thin strips
green sprouts
green onions, chopped
dried cranberries
pumpkin seeds

Toss all greens and then top with sprouts, onions cranberries, and pumpkin seeds.


And for the dressing...


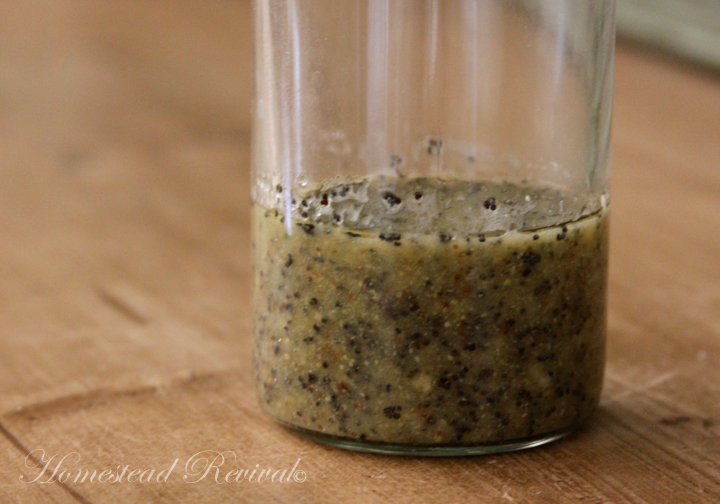
Poppy Seed Dressing

1/2 cup olive oil
3 T. apple cider vinegar
2 T. lemon juice (sometimes I substitute lime)
2 T. dijon mustard
2 T. honey
2 T. poppy seeds
1/2 tsp. minced onion or onion powder
1/4 tsp. sea salt

Blend well by shaking in a jar and allow to sit for about 1/2 hour for flavors to blend. It's best to make it before you begin your salad and periodically give it a good shake. (At least it makes me feel like the flavors are converging that way.)

I'd love to hear some feedback on how you like this "recipe" and how you're incorporating greens into your diet.


This post was linked to Carole's Chatter: Food on Friday

Friday, February 8, 2013

Peanut Butter Balls

I can not believe I haven't posted on this yet! Peanut Butter Balls are the BEST! Well, my daughter thinks so, anyway. But I bet your kids will, too, if mom and dad don't eat them after their bedtime first!

PBB make a great afternoon snack or they can be just right for a light lunch served with apple or banana slices and maple yogurt dip. And because you make them from scratch, you can control the ingredients and keep these as healthy or decadent as you please.

This recipe has lots of latitude for you to adjust ingredients, so just use your imagination and go for it! I'm posting the original recipe and then my modified version that I typically make, but it could change on any given day.

Original Peanut Butter Balls

1 cup peanut butter
1/2 cup honey
1/4 cup toasted wheat germ
1 cup Kashi puffed cereal


Walker Family Version of Peanut Butter Balls

1 cup organic peanut butter (no sugar variety)
1/2 cup raw honey
1 - 1 1/2 cups homemade granola

Using one of the recipes above, combine ingredients and mix well by hand. Roll into 2" balls and cover with toppings.


Toppings:
shredded coconut (raw or toasted)
granola
finely chopped nuts
finely chopped carob chips or chocolate chips
melted chocolate
* Toppings are easily chopped in a small coffee grinder.


Place on a cookie sheet that has been lined with wax paper. Chill in freezer just until hardened. Transfer to an airtight container and store in refrigerator. Monitor closely as these have a way of suddenly disappearing when your back is turned...


Ah, well... much healthier than a lot of things the kids could be eating!

What will you coat your peanut butter balls with?


Thursday, December 13, 2012

Simple Cookies with Big Flare!

I love all those gorgeous Christmas cookies that are beautiful decorated with all sorts of icing and such. You know the ones... like Martha Stewart makes.

But seriously... during the holidays, one of the BUSIEST times of the year, who has time to do all that? I wanted something that LOOKED spectacular, but really didn't require too much effort. Something the kids could help with.

Found it. Jay's Catering in Garden Grove, California had these DARLING cookies. So I took their idea and made my own using a simple gingerbread recipe. I did modify them a bit... Jay's uses two cookies and sandwiches them between a cream filling. I skipped the cream filling.


So how is this so simple? Well the cookies are just rolled balls, not cut outs. Second, the white on them is just melted white chocolate... dip and dry. EASY. Finally, the red and green holly leaf is about as easy as you can get with icing. You can crank these out in mass quick as a wink!


I'm including the Gingersnap recipe for you here, but I would add more ginger if you want that sharp ginger taste, especially since the chocolate or candy melt softens it a bit. Personally, I wanted more of a bite to the cookie so as to compliment the mild candy taste. Really, you could use any cookie recipe and just decorate it accordingly.

For the "chocolate", I just used Wilton's White Candy Melts, so they really aren't chocolaty, but if you can find the chocolates it would be even better. For the holly berries and leaf I used Wilton's Meringue Powder and coloring.

Gingersnap Cookies
from Joy of Baking
Makes about 4 dozen cookies

Ingredients


3/4 cup (170 grams) unsalted butter, room temperature
1/2 cup (105 grams) dark brown sugar
1/2 cup (100 grams) white granulated sugar
1/4 cup (60 ml) unsulphured molasses
1 large egg
1/2 teaspoon pure vanilla extract
2 cups (260 grams) all purpose flour
1/2 teaspoon baking soda
1/4 teaspoon salt
1 1/2 teaspoons ground cinnamon
2 teaspoons ground ginger
1/2 teaspoon ground cloves
Garnish: extra granulated sugar

Directions


In the bowl of your electric mixer (or with a hand mixer), beat the butter and sugars until light and fluffy (about 2 - 3 minutes). 

Add the molasses, egg, and vanilla extract and beat until incorporated. 

In a separate bowl whisk together the flour, baking soda, salt, and spices. Add to the butter mixture and mix until well combined. 

Cover and chill the batter for about 30 minutes or until firm. 

Preheat the oven to 350 degrees F (180 degrees C). Line two baking sheets with parchment paper. 

Place about 1 cup (200 grams) of white granulated sugar in a medium sized bowl. When the dough has chilled sufficiently, roll into 1 inch (2.5 cm) balls. Then roll the balls of dough into the sugar, coating them thoroughly. Place on the baking sheet, spacing about 2 inches (5 cm) apart and, with the bottom of a glass, flatten the cookies slightly. 

Bake for about 12 -15 minutesor until the cookies feel dry and firm on top.  (The longer the cookies bake, the more crisp they will be.) Cool on a wire rack. 

Enjoy with a cup of Christmas tea!


Wednesday, November 7, 2012

Salted Maple Popcorn!

Sad Proposition 37 didn't pass? Me, too.

Here... some Salted Maple GMO-free popcorn will make it all better!


Salted Maple Popcorn
Recipe Courtesy of This Homemade Life

Ingredients:
1 cup organic popping corn* (unpopped)
3 T. butter - separated into 2 T. and 1 T.
1/3 cup maple syrup
1 tsp. vanilla
sea salt (in this case I used Redmond's Real Salt - it has minerals, thus the flecks you see)
natural wax paper or natural parchment paper

*corn labeled organic by law is GMO-free


Directions:
Place popcorn and 2 T. of butter in your "semi-off-grid" popcorn popper and pop nice and fluffy. Pour into a large bowl and set aside.


Melt the remaining 1 T. of butter in a small saucepan and then add maple syrup and gently whisk together. Turn off heat and add vanilla.


Immediately pour over popcorn and toss. This takes a while to coat all the pieces really good. I find that it helps to have four hands... two to hold the bowl and occasionally turn it and two to use large spoons to toss (or use your hands).

Turn out onto wax paper and spread into a single layer. Salt to taste.


Allow to air dry and then consume at will.

Yeah, right. We haven't had a dry batch yet... it's gone quicker than you can say...

"I'll take my corn organic, thank you very much"! 


Tuesday, September 18, 2012

Pumpkin Cookies (Regular and Gluten-Free!)

This is a favorite fall cookie for all three of my daughters. It's soft and full of autumn spices... and tastes much better than it looks. As a health conscious mom, I really like that this treat isn't as sugary as most cookies since I use sucanat in place of traditional white table sugar... well, with the exception of on top. We just like that white sugar look, if you know what I mean. Makes them seem so... decadent!

If you have your own pumpkin, you can cook it down and use the flesh or just open a can of pumpkin and use that instead. And I'm all for eating them as a breakfast treat, but typically, they're best consumed slowly around mid-afternoon with a cup of hot tea.

Recently, we've adapted this recipe to include a gluten-free version (as one of the girls has become highly sensitive). Can you tell which is which?

You might be surprised...

The one on the left was made with home-ground hard white whole wheat flour (but I typically use soft white), while the cookie on the right was made with Bob's Red Mill All Purpose Gluten-Free Flour. It actually came out prettier! And I think the texture was actually pretty similar. In the end, if I did a blind fold taste test, I'm not sure my girls would be able to tell which was the gluten-free cookie and which was the whole wheat version.


Ah, yes... they are both very nice! The only thing I think I like better in the fall is a good molasses cookie! Perhaps we'll have to adapt that one next week and do a side-by-side comparison. However, I'm quite sure it will take more than one cookie to determine which is best!

Pumpkin Cookies

4 C. flour (for gluten-free flour, please see note below)
4 tsp. baking powder, non-aluminum
1 1/4 tsp. baking soda
1/2 tsp. ground ginger
1/2 tsp. allspice
1/4 tsp. ground cloves
4 tsp. cinnamon (divided)
1 tsp. salt
3/4 C. butter, softened
2 - 2 1/4 C. sucanat (plus 4 T. for topping)
2 eggs
1 15 oz. can pumpkin
1 C. pecans, finely chopped (optional)
2 C. raisins (optional)

1. Preheat oven to 375 degrees. Lightly grease cookie sheets (or use parchment paper).
2. Combine flour, baking powder, baking soda, ginger, allspice, cloves, salt, and only 1 tsp. of the cinnamon. Set aside.
3. Cream butter and then slowly add sucanat until blended. Continue beating while adding eggs and pumpkin.
4. Add the dry spice mixture to the creamed ingredients and beat until blended.
5. Stir in pecans and raisins by hand or on lowest setting.
6. Drop cookies onto the cookie sheet using spoons - leaving 2 inches between each scone. Flatten the scone with the back of the spoon.
7. Combine 3 T. cinnamon and 4 T. sucanat. Sprinkle on top of each cookie.
8. Bake 8 - 12 minutes or until golden brown. cool for 5 minutes before removing to a cooling rack.

NOTE: When substituting gluten-free flour, add an additional 2 T. per cup of flour.

Make a bunch ahead of time and pop them in the freezer. Cookies quickly thaw and you'll have a treat whenever company arrives or you're asked to brink something to a gathering. Or you could just eat one every day... for medicinal purposes, of course. It's an excellent remedy for fall fever.


Simple Meal Planning - Plan to Eat

Wednesday, June 20, 2012

Purslane

This guest post was written by my daughter, Kate who blogs at To Live, Not Exist. She is currently completing her college on line through College Plus and working at an organic farm (along with some house cleaning and volunteer work). 


One of the weeds they've been combating on the farm is Purlsane. When Kate traveled to a third world country last year to work on an organic farm, they ate Purslane and found it very tasty, a bit like watercress. She brought some home this past week and we had a really great meal (much to my surprise)! Even our youngest like it. 


I love that we're learning about native wild edibles and actually making REAL food we can eat and ENJOY! How many wonderful food adventures await us that we never knew about?
Thanks, Kate!


Photo Credit: World Crops


Purslane Facts

• Rich in fiber, minerals, and vitamins
• five times more omega-3 fatty acids than spinach
• high in vitamins A, B, and C
• rich in anti-depressant and anxiety combative substances
• high in iron and calcium
• also a source of protein

For additional nutrition information, visit Mother Earth News Power-Packed Purslane.

Photo Credit: Plant Photos Wiki
Did You Know?

• Indian and Greek herbalists celebrate its healing qualities
• Medieval herbal sources describe Purslane as "cold", meaning that it was considered a cure for a "burning" (malfunctioning) heart and liver
• Greeks call it a "blood-cleansing" herb
• In Mexico, Purslane is considered good for diabetics and it is often cooked with pork and tomatillos
• The Chinese us it in Oriental medicine
• The French eat it with fish


Sauteed Purslane with Mushrooms and Tomatoes
Serves 4; gluten-free


4 cloves of garlic, minced
1 can of diced tomatoes
2 C. mushrooms, diced
1/2 C. olive oil
1 large bag/bunch of Purslane
2 T. fresh oregano, chopped 
1 lemon, juiced
2 T. fresh basil, chopped 
1 yellow onion, chopped
salt & pepper to taste
tempe, optional
feta cheese, optional

Saute the garlic, onion, and mushrooms in olive oil until translucent. In a large bowl, mix tomatoes, Purslane, lemon juice, basil, and oregano. Add the Purslane mix to the saute pan and salt and pepper to taste.

If desired, saute slices of tempe and then crumble on top along with feta cheese (or just add feta cheese) and serve.

Please be sure you learn to correctly identify Purslane or any wild plant before eating! Spurge (wiry and milky inside if you break open a stem) grows alongside Purslane, looks very similar, and is toxic! 

Bon Appetite!


Wednesday, March 7, 2012

Whole Wheat Scones

Because I grind all my own wheat, I have to search for recipes that allow me to use only fresh ground flour or 100% whole wheat. However, most recipes call for half whole wheat and half white flour. While this may be better than an all white flour product, I prefer 100% whole wheat.

Unfortunately, not all recipes result in the same lovely product in the end when you use only fresh ground whole wheat. So when I find a recipe that does work, I get v. e. r. y. excited! Like this whole wheat scone recipe I found at Chocolate and Carrots. When you remove the chocolate chips, you can substitute just about anything you want for different flavors and new scone creations! (Note: I made a couple of minor substitutions.)


Chocolate Chip Scones with Raw Sugar

Whole Wheat Scones
from Chocolate and Carrots
1 1/2 cups whole wheat pastry flour (soft white wheat)
1/2 cup whole wheat flour (hard white wheat)
1 tablespoon aluminum-free baking powder
3 tablespoons cane sugar
1/8 teaspoon sea salt
5 tablespoons cold unsalted butter, cut into tiny pieces (1/4 inch or smaller cubes)
1/2 cup plain 0% fat Greek yogurt 
1/2 cup raw milk
1 cup total of add-ins (ie: chocolate chips, nuts, cranberries, apple slices, cinnamon, blueberries, orange zest, or perhaps a combination!)
optional toppings: raw sugar, powdered sugar icing, etc.


Apple Raisin Cinnamon Scone with Icing


Preheat oven to 425°. Combine flours, baking powder, sugar and salt in a bowl and mix until well blended. Add butter to dry ingredients and mix until butter is spread throughout. Add whatever fun add-ins you wish to include. Gently mix in milk and yogurt until you’re able to switch to kneading it with your hands. Form dough into an 8 inch circle and cut into eight slices. Be sure to separate the slices and place on a baking sheet with parchment paper. To get that nice browning on top, brush with water and bake 15 minutes or until browned. 


Note: If desired, sprinkle the tops with raw sugar prior to baking. Or if you prefer, brush with water, bake, and after they cool, drizzle with icing.


This weekend a few friends gathered for high tea to celebrate a birthday. Besides the Chocolate Chip Sconce and the Apple Raisin Cinnamon Scones, I made a few Blueberry Scones with Orange Zest and Orange Icing. Just be sure to use dried blueberries if you want to avoid blue scones! 


According to my discerning taste tester, they received a 5 star review.


Wednesday, January 4, 2012

Plan To Eat

Okay. So it's a new year and I have fallen off the "healthy eating wagon" a bit. I do every December! {sigh....} Such is life. If I eat well 11 months of the year, I'm pretty happy with that. But it's January and time to get back to REAL food and eliminate so many sweets.

For inspiration, I decided to get try a new menu planning program: Plan To Eat. Actually, I tried it a few months ago, but wasn't really motivated at the time and I didn't find out all that it could do. I was overwhelmed thinking I had to load every single one of my recipes by actually typing them in so that I could utilize the program well. Not so. After spending quite a bit of time on their site, I realized I had missed a lot this program has to offer. 

Here's the basic includes...

• a menu planner for breakfast, lunch, dinner, and snacks with an easy drop and drag function from recipes you input into your recipe box (but you can also just type in your own items/notes - this is one of the things I failed to figure out the first time around!)


• a recipe book where you can store your recipes from home and from the internet and invite friends to join you and share recipes (more about this in a minute)


• a shopping list that will also store your pantry inventory and allow you to cook based on what's in your pantry at the moment (just click the "Cook from My Pantry" button and recipes matching your ingredients will pop up)


• the ability to create an iPhone mobile ready "app" so you can quickly access information at the grocery store or on the run (I'm forever needing to have my actual menu with me when I'm away from home)


Now that you know the basics, let me expand on one of my favorite things about this site. If I find a recipe on a blog or website that I like and want to try, I can easily upload it into the Plan To Eat recipe planner. There's a little link you add to your tool bar which you click when you find the page with the recipe you want - much like the "pin it" link for Pinterest. When you click the button on the toolbar, it opens a window up on the right side (see photo below) and will either automatically upload the recipe or if it can't do that, it will make it easy for you to copy the information and paste it in each section. Trust me... it works quickly and easily! (Again, this was something I didn't realize earlier and it makes it soooo much easier!)


After the recipe is uploaded into your Recipe Book,  you can then add a photo.


I looked at several other menu apps for iPhone, but I didn't find one that also had a computer version. And really, I wanted the iPhone app just as a back up for when I'm at the store and shopping. Most of my menu planning happens at home on the big screen. Plan To Eat had both.


Interested yet? What if I told you they give you a 30 day free trial? Sweet.

Simple Meal Planning - Plan to Eat


Go ahead... try it out and kick the tires a bit. See if it works for you. Give yourself 15 minutes each day for the first week or so to add some recipes and in no time, you're going to be loving this site. And you'll be oh-so organized and motivated to eat healthy! Just think... we could be friends on there and share recipes!

Bon appetit!


I have not been compensated in any way for my review of Plan To Eat. My opinions are my own based on my own use of the program.


LinkWithin

Related Posts with Thumbnails