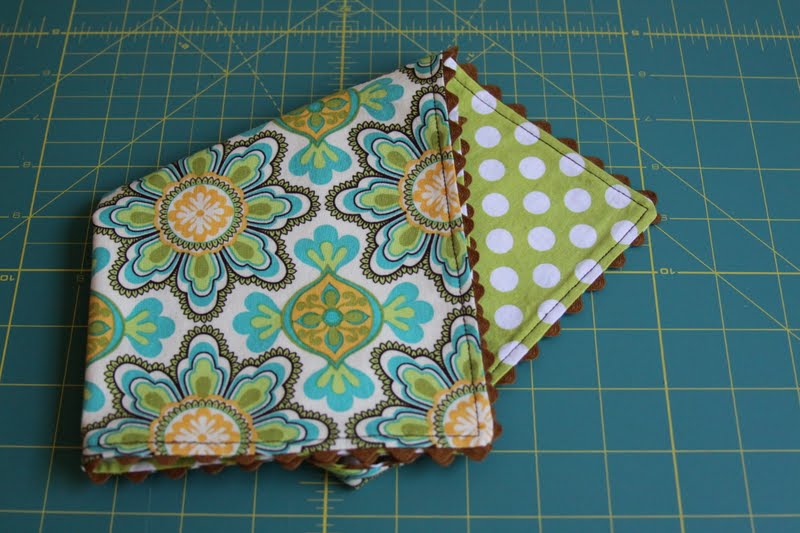
How To Sew A Reversible Napkin
Cut two pieces of fabric the same square size. If you want to conserve fabric and use your yardage wisely, you can cut 3 squares from a piece of fabric 42 - 45" wide (standard bolt sizes). Each square will be 13 1/2". However, your napkins will not be very large (perfect for ladies and the younger crowd). Because I only had 3/4 a yard, I opted to do this, but I prefer to cut my napkins 17 1/2" square. Obviously, it costs more to do this, but it's an option all the same.
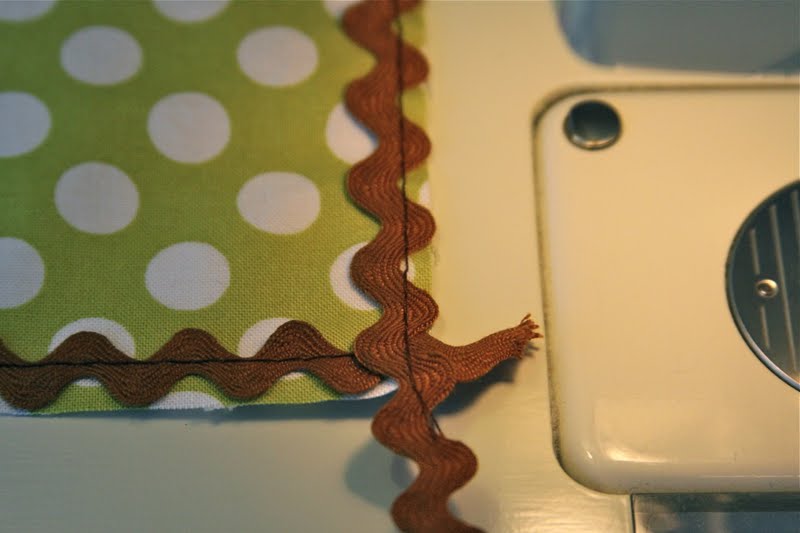
Next, pin your ric-rac to the edge of the right side of the first fabric. I set my stitch length to baste and moved my needle to the right so that the basting stitch would be hidden in the seam.
Stitch around the napkin edge...
and tuck the corner in or fold it inward...
and keep going until you return to the beginning. Trim the excess ric-rac.
Lay the second fabric on top with the first fabric with the right sides facing each other.
Match the edges and pin all the way around.
Readjust your stitch length to a normal setting (mine is about 2.5) and move your needle back to the center position. Stitch around the edge about 1/4" or so - just inside the basting stitch (you want the basting stitch on the right and the new stitching on the left).
Be sure to leave an opening to turn the napkin. You can barely see my opening in the picture below, but it's about 5-6 inches wide on the bottom edge.
Cut the bulk off the corners as shown below (I actually tapered it even more with a second and third cut, but forgot to photograph that)...
Turn the napkin inside out and press the edges so they are completely open and flat. Press the opening as well so that it lies flat like you want it to be when it's sewn shut.
Stitch around the outer edge. I believe I stitched mine at 1/4", but you can do it any width you like. This time you'll stitch all the way around, including the opening.
Press and you're done! I like to do these in an assembly line so that I do all the steps on each napkin at the same time.
I wish I had taken a picture of the stack when I was finished. They looked so fun! A few of these paired with some woven placemats or a cookbook make a lovely wedding gift! (At least I thought so.)

I like this! Good ideas for holiday gifts that you might be able to make from leftovers! I'll have to try this.
ReplyDeleteLove it! Thanks for sharing! Now I have another excuse to drag out my sewing machine and to not get things done around here, lol.
ReplyDeleteLove these (and the fabric)! I have a stack of fabric waiting to be cut and sewn into napkins when I have time (ha!), so this is very inspiring.
ReplyDeleteI love these! You need to open an Etsy store so us folks who have not talent for sewing can shop!
ReplyDeleteThey look wonderful ! Very talented and crafty person you are, thats great ! have a good day !
ReplyDeleteBeautiful!
ReplyDeleteI use cloth napkins at home, but they are HARDLY as lovely as yours. I might have to take the time to make some beauties like those. Great job and lovely fabrics!!!
ReplyDeleteSEW CUTE!! XXOO, Damaris
ReplyDeleteI love them with rick rack. I always make my napkins reversalable, but next time I'll try them with some rick rack. I also prefer the smaller size for day to day and save my larger size napkins for dinners or special occassions.
ReplyDeleteDearest Friend,
ReplyDeleteI am a new reader here and I just love this tutorial...so lovely and perfect for my summer picnic table. I will have to head to the fabric store soon.
Yours so kindredly,
Shan
Honey Hill Farm
Great tutorial and simply adorable napkins! I love ric-rac, too, and it completes the napkins beautifully.
ReplyDeleteVery cute!
ReplyDeletelove love love..the tutorial and fabric!!
ReplyDeleteHugs
Granny Trace
www.grannytracescrapsandsquares.com
I <3 rick rack too! It's just adorable on dresses!
ReplyDeleteI love the ric rac! Very pretty napkins. I really need more. We switched to cloth napkins last fall and I love them!
ReplyDeleteGreat idea.... With the cost of paper products these days, this is a great way to save money..
ReplyDeletethanks for sharing..
shug
Hope your weekend is great...
I am going to have to try this, the napkins we use are hand towels cut in half, that's it....I am going to try this in June, it will be pretty using some fun summery fabric. Thanks
ReplyDeleteHow pretty! Thanks for sharing your method. I have to admit, most of my cloth napkins are thrift store finds. With setting a prettier table as one of goals for this year, these just may be the way to go.
ReplyDeleteThese are just lovely. You made it look so simple, too. Thanks for sharing this tutorial. I might just give it a try.
ReplyDeleteElisabeth
What a darling set of napkins you now have and I too love rick rack. :o) I will need to try this as well.
ReplyDeleteHoping your weekend is a wonderful one.
Sincerely, Trish
Love the napkins!! Would you mind sharing where you found the green/ white dot fabric? I made my daughter's nursery bedding and it looks like the exact same fabric as her sheets. I haven't been able to find it at the fabric stores around here.
ReplyDeleteOh - these are beautiful (as is your entire blog! Such a beautifully welcoming feel to it.)! I am such a fan of family dinner, and I love your other post about making it special and welcoming for your family! This will go on my to do list as I strive toward that myself.
ReplyDeletewhat a fabulous step-by-step for a newbie like me! can't wait to make these with my girls!!! thank you for sharing :)
ReplyDelete