.

Showing posts with label Sewing. Show all posts

Friday, May 27, 2011

Reversible Napkin Tutorial

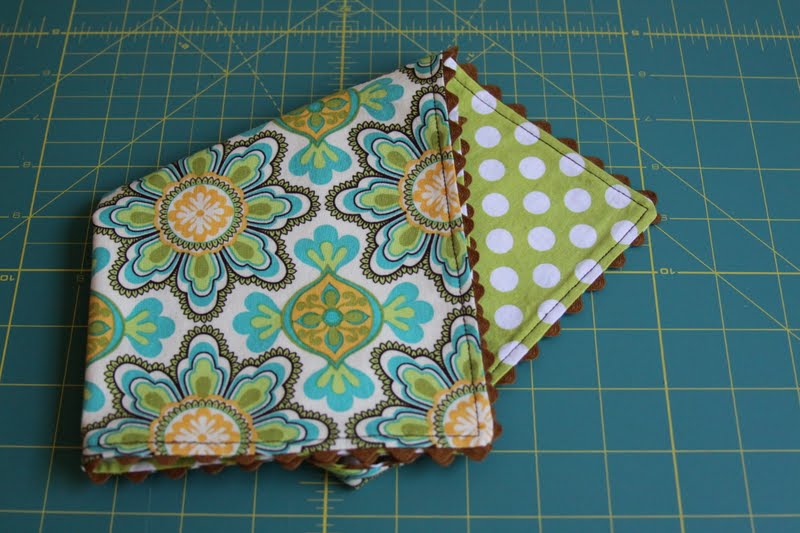
I just love these reversible napkins! It could be because I like coordinating fabrics, but I suspect it's mostly because I adore ric -rac trim and I'm always looking for places to add it.  


How To Sew A Reversible Napkin


Cut two pieces of fabric the same square size. If you want to conserve fabric and use your yardage wisely, you can cut 3 squares from a piece of fabric 42 - 45" wide (standard bolt sizes). Each square will be 13 1/2". However, your napkins will not be very large (perfect for ladies and the younger crowd). Because I only had 3/4 a yard, I opted to do this, but I prefer to cut my napkins 17 1/2" square. Obviously, it costs more to do this, but it's an option all the same.


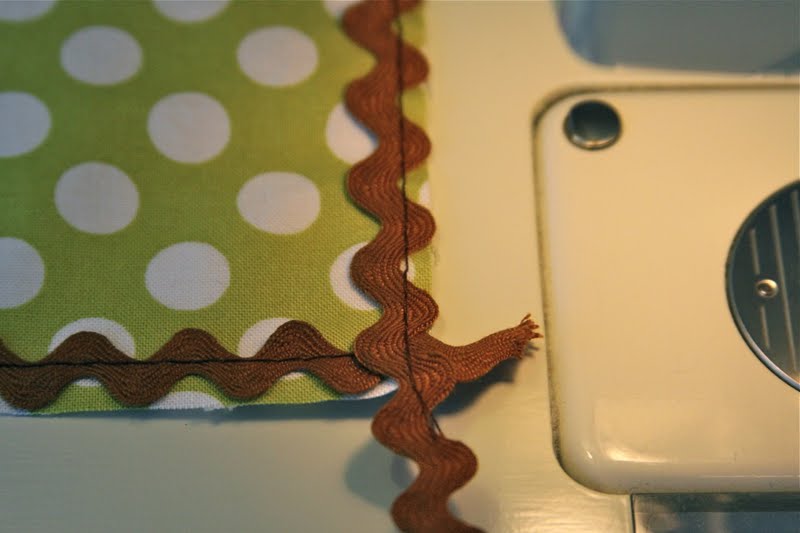
Next, pin your ric-rac to the edge of the right side of the first fabric. I set my stitch length to baste and moved my needle to the right so that the basting stitch would be hidden in the seam.


Stitch around the napkin edge... 


and tuck the corner in or fold it inward... 


and keep going until you return to the beginning. Trim the excess ric-rac.


Lay the second fabric on top with the first fabric with the right sides facing each other. 


Match the edges and pin all the way around.


Readjust your stitch length to a normal setting (mine is about 2.5) and move your needle back to the center position. Stitch around the edge about 1/4" or so - just inside the basting stitch (you want the basting stitch on the right and the new stitching on the left). 


Be sure to leave an opening to turn the napkin. You can barely see my opening in the picture below, but it's about 5-6 inches wide on the bottom edge. 


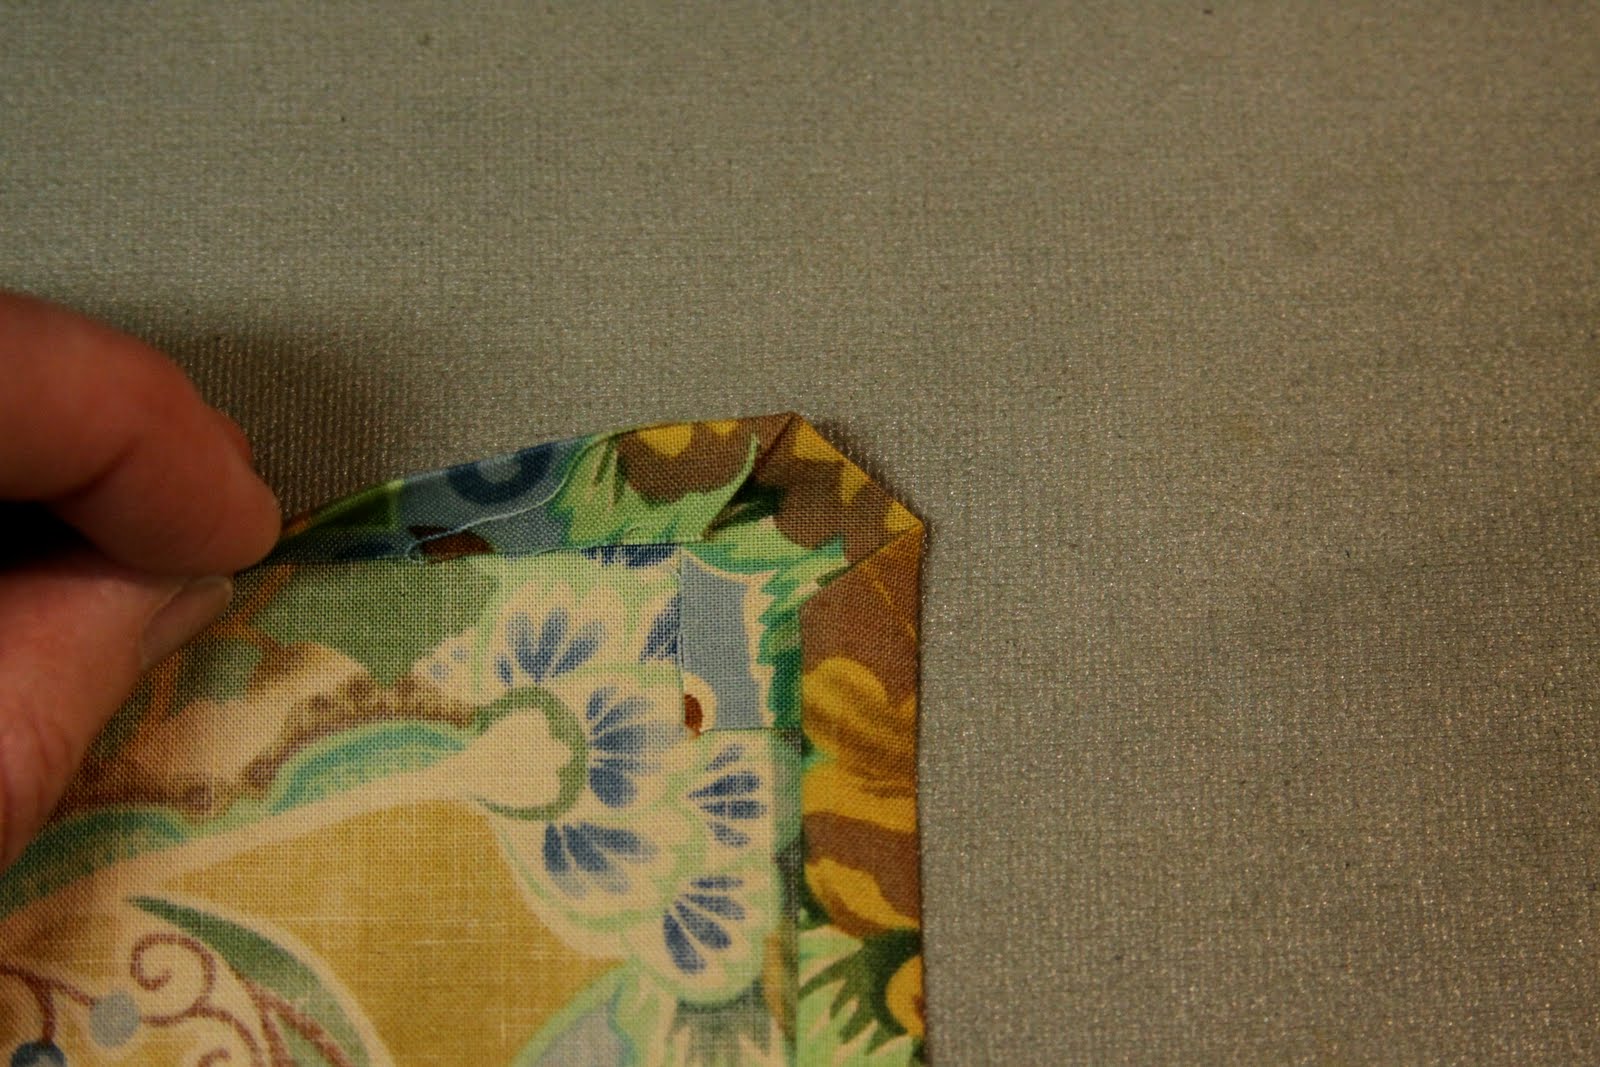
Cut the bulk off the corners as shown below (I actually tapered it even more with a second and third cut, but forgot to photograph that)...


Turn the napkin inside out and press the edges so they are completely open and flat. Press the opening as well so that it lies flat like you want it to be when it's sewn shut.


Stitch around the outer edge. I believe I stitched mine at 1/4", but you can do it any width you like. This time you'll stitch all the way around, including the opening.


Press and you're done! I like to do these in an assembly line so that I do all the steps on each napkin at the same time.


I wish I had taken a picture of the stack when I was finished. They looked so fun! A few of these paired with some woven placemats or a cookbook make a lovely wedding gift! (At least I thought so.)


Tuesday, May 24, 2011

Modest Wardrobe Solution: Sew Skirts!

How do you clothe a 5'3" twelve year old who is still growing at the speed of light? It's not like you can run down to the department stores and find a suitable modest outfit. I typically can find something if they're a size 16 and under or even a misses size 4 or larger, but there's that "no-man's-land" in between... the time where young girls are neither "little girls" nor ready to call themselves "young ladies" that's always troublesome. 


I should mention at this point that we don't even try to shop the Juniors departments in most stores because the issue of modesty is non-existant unless you're extremely thin and have short legs. I had the same issue when my oldest was in this phase of life and I suspect I'll face it again when the youngest is there as well. Do other mothers have the same difficulty or is it just me? Someone should start a line of clothing called "In Between Tween and Teen". They'd make a fortune. 

So in my frustration, I decided it was time to sew some skirts. While there are still very few patterns out there geared specifically for modest in-betweeners, at least you can make adjustments to meet your needs. I did find one pattern that was just below the knee and if you prefer longer skirts, I'm sure you could extend the yoke at the top or the trim at the bottom. I think it would look really cute with a pair of cowgirl boots or in just a couple of fabrics if the wild pattern of many is too much.

I decided to make the "classic" version (on the left) and use some coordinating fabrics that would look lovely with my tween's blue eyes. Because she's 12 going on 16, I thought it would be best to use some more mature fabrics along with some fun geometrics and use several to keep it a bit funky. The last thing I wanted to do was spend time making a skirt that she wouldn't wear because it looked "old lady" like.

If you're planning on making this skirt, it really is easy but the instructions would not be adequate for a true beginner. She does not clearly state that certain parts need to be gathered (such as the main portion where you've pieced the fabrics which must be attached to the yoke that is not gathered) and neither does she tell you how to gather. This wasn't an issue for me since I've sewn for years, but I could imagine the frustration of someone just starting out! 

Also, I didn't cut it out the way she suggested. I know all the fabrics should be cut the same direction so as to hang correctly, but to do so would take nearly twice the amount of fabric. (Have you priced material lately?!!) Perhaps I shouldn't have done so, but I turned the pieces a quarter turn so as to keep the cost down. With all the top stitching, it did not seem to affect the way it looks in any way.


Fabrics coming together.
Despite several small mistakes, I was pleased with how the skirt came out. And thankfully, my 12 year old was thrilled and anxious to wear it! She paired it with a dressy white t-shirt and a brown 3/4 length sleeve cardigan sweater with a ruffled edge (it's still cool here!). She looked lovely and modest, yet not frumpy. Just what we were aiming for.

The finished skirt!
It wouldn't do to not make something for the 9 year old, too, so I whipped up an easy skirt with left over material and trim without a pattern. It was basically just two strips of fabric cut on the fold, sewn into tubes and a gathered waistband, which works for the more petite little girls, but not so much for those who are starting to develop a more mature figure. You should have seen her Sunday with her skirt and red cowboy boots! So darling!


Since it's been a while since I've sewn, I had to find new pattern companies, websites, etc. Pink Fig has some cute things as does Butterfly Kisses, but most are for the toddler to size 10 crowd. Fairytale Frocks and Lollipops has an entire section on just Tween/Teen patterns, but you'll have to sift through a few to find the gems.


How do you dress a tween or teen modestly? Any ideas for where you like to shop or a great pattern?


Tuesday, May 17, 2011

More Dinner Napkins!

It's rainy and cold again. Not very conducive for gardening, but very nice for sewing! I'm busy upstairs making things this week and having a grand time. 


Since we eliminated paper napkins, I've had fun making a few cloth napkins. By using white dinner plates, I can add just about any color of napkin or pattern that catches my eye, including mismatched napkins! Just keep a color theme and you can go wild!


Patterns and batiks are best because they hide stains; be sure to stain treat them right away if they are very soiled or oil based foods get on them. I just add these to whatever load of laundry is going in the wash so they don't pile up and the stains don't get so set. When we have something really messy, like bbq ribs or chicken, I keep some paper towels on hand to use instead, but otherwise, we use these every day.


Ironing isn't always necessary depending on the fabric and if you pull them out of the dryer quickly or hang them nicely on the line. But when they do need ironing, it's perfect for my youngest to practice her ironing skills.


I have a basic napkin tutorial if you'd like to make some of your own. And my daughters are wanting some that are reversible with ric-rac trim, so hopefully I'll get to those soon and post them as well.


I really have a thing about the dinner table being a lovely and inviting place for the family; a place where everyone wants to be each evening and linger in conversation, games, or family devotions. Little touches like cloth napkins just add an extra bit of ambiance that says LOVE.


Wednesday, April 28, 2010

Beginning Sewing Lessons

Summer is right around the corner! Have you made plans for what your daughters will do with their time? Perhaps they're ready to learn to sew? Here's another reprinted post from my old blog that may give you an idea of how to get started. Start gathering supplies and resources now so that you'll be ready in June!

Years ago I taught my oldest daughter how to sew. Now that the two younger girls (Annie, 11 and Moira, 7) are old enough, I decided to give it a try. Fortunately, we are blessed to have three sewing machines around the house, so everyone can work on one at the same time. This certainly makes it easier, but of course, it's not necessary.

When Kate was little I used Nancy Smith and Lynda Mulligan's book The Best of Sewing Machine Fun for Kids. I still had her copy and picked up an additional one at the local library. This book is so well laid out that it makes it a breeze to progress from step to step. Besides learning the parts of a machine today, the girls began to actually use the machine by sewing on lined notebook paper without any thread - only a needle. This allows them to practice guiding the paper and sewing in a straight line while learning how hard to push the foot peddle. A real challenge for a beginner, but lots of fun!

Great directions and layout that makes instructions easy to follow...


Annie deep in concentration as she stays on the lines...


Moira on my mother's old machine that I learned on years ago...


This was our first session. Next... sewing on curved lines on paper, then we'll progress to sewing in a maze. By next week, we should start learning to thread our machines and practice changing colors while learning to sew dot to dot! After the girls make some paper ornaments out of brown paper sacks that are stitched and stuffed, we are going to skip to a pillow case project that I have planned before going back to the book to work on more curved lines.

Charlotte Mason believed children should learn real skills that are useful in life. I couldn't agree more. And they are eagerly soaking it up! This is the kind of activity that builds confidence and a sense of accomplishment.


Thursday, April 1, 2010

Cloth Napkin Tutorial

If you've read my post Dinner Napkins, then you already know I love using cloth napkins. Most of what I already own are purchased napkins. Some of which are really nice; too nice for me to want to use for everyday dinners. But I still wanted some pretty napkins for weeknight meals that were inexpensive and easy to care for. 


This week, I decided to start making some of my own. That way I could pick the fabric myself, make them the size I wanted, and keep the costs down to something more reasonable. Also, I plan to have my two younger daughters practice their sewing skills by making some with me! It's a great project for beginners because they can practice both straight stitches and turns, however it requires almost more time at an ironing board than the sewing machine!

When choosing fabric for napkins, keep in mind a few things:

1) How easy is the fabric to care for? Will it hand press nicely or must it be ironed every time? (Remember, this is for family night, not company, otherwise I'd recommend ironing for sure!) Tip: If they tend to wrinkle and it bothers you, try gathering them from the center point and slipping them in a napkin ring.

2) Is the fabric soft to the touch? Since it will be used on the face, you will want it to be gentle to the skin.

3) Will the fabric hide stubborn stains easily? A solid fabric will show stains and wear faster than a busy print. It may not be everyone's style, but it's something to consider.

4) How much fabric do you really need per napkin? I chose to make mine about 15 - 15 1/2 inches because more fabric costs more money and these fit nicely on the ironing board if I choose to iron them and I only have to move them once while ironing in order to do the whole napkin.

The cheapest fabric isn't always the best choice. Consider the time you will invest making them as part of your decision. Once you've made one and understand the process, making them in an assembly line fashion will save you some time.

Steps For Making Cloth Napkins

Cut your fabric so that it is the size you wish plus an extra 2" for the length and the width. The extra fabric will be turned under, so make sure that you allow for these seams by adding the extra two inches. (Save those scraps for a scrap quilt!)


Next, make a triangle template (something that you can reuse several times out of card stock or other sturdy paper). This will be used to press a corner down to make a miter without having to measure every single time. Speed is helpful when making lots of corners! My triangle was 2  1/8" on the long side by 1  1/2" on the two shorter sides. I came up with this by folding down the fabric and sides until I found what worked best (it's a bit complicated to explain in writing, but I basically did one corner and then made a template to match). You can see my white template on the wrong side of the fabric below...


Press the corner over the template...


And then start pressing all four sides toward the wrong side. I turned under about 1/2" to 3/8" seam. On a project like this, I honestly don't measure much, I just make sure I do it the same all the way around. This is the kind of project I want to do quickly and I'm not necessarily looking to do it perfectly. However, if they were a gift or I was teaching my girls, I'd certainly measure!


Going back around, turn under a second time the same amount and press again...


Now you need to trim the excess from the corner (can you see it in the photo above sticking out from the mitered corner?). To do this, make a mark with a quilting pencil, open up the edges you previously ironed, and then draw a line across. Cut across the line to remove the excess fabric. (As I did this several times, I noticed that the iron had made marks that guided me perfectly in this, so I just ended up using these press lines to make my cut instead of marking them). 

Update 5/17/11: I now just fold this extra tip under a second time and press, then sew. It is perfectly hidden and not too bulky. And it saves a LOT of time!


Update 5/17/11: Instead of cutting this, just fold it under again and press! No need to cut it!


Pin around the edges...


And stitch as close as you comfortably can to the inside edge of the fabric...


Stitch all the way around and be sure to back stitch once you've crossed over where you began so it won't come unstitched. You now have a finished napkin!

Update 5/17/11: If you want the top stitching to be even with the edge on the front side, flip the napkin over to the right side to sew and use the edge of the napkin as your guide on one of the markings on the silver plate of your machine.


I thought it would be fun to make some that were similar in color but mismatched. That way if one is lost or has to be discarded to the rag pile, another can take it's place. As these are used and washed, I hope they become even softer and more enjoyable!

Trust me when I say that I didn't go for perfection on these. Speed was important because I want to make a big basket full so we can start using these nearly every day instead of once a week. I think a big wicker basket would be perfect for housing a bunch in various colors for every day use!

Is anyone making or using napkins for everyday, too?


Wednesday, March 10, 2010

Bread Bag Tutorial

When I wrote last week's post Bread Storage Without Plastic , I had hoped to find some time this weekend to make some bread bags. And fortunately, I was able to do so.


On Saturday, I stopped by a favorite antique store in town and found an old vintage linen table cloth that must have been about 4' x 4' (just guessing). It wasn't a tea towel, but it was a lovely linen fabric, some of the best I've seen. The edges had a nice binding which meant less finish work for me! And it had a simple but pretty hand stitched pattern that looked a bit like wheat to me (just a bit; just imagine that it is!).


To make a bread bag, I suggest you bake a loaf first so that you can use it as a guide for how big  you need to make the bag. I wrapped the fabric around my bread and then added a bit for extra room and to make it easy to get the bread in and out. So sorry I don't have any exact measurements for you, but as long as you make it big enough, you can always cut it down later if it's too big.

Next, use pinking shears or a serger to finish of the edges that are not already finished. This will prevent raveling when you wash your bag.


Press the top edge over about 1 1/2" toward the inside of the fabric (also known as the wrong side of the fabric). 


Fold the fabric in half lengthwise so that the right side of the fabric is now on the inside. (This is really hard for you to tell in the photos because the linen is the same on both sides. I had to keep looking at the embroidery to tell which was the right side!). The top portion that you pressed down in the prior step should now be on the outside.


Pin and stitch on three sides, leaving the top open. (It doesn't really matter how far from the edge you stitch on this project).


Using your pinking sheers or scissors, cut a diagonal across the bottom corners to reduce bulk when you turn your bag. Just don't cut too close!


You should now be able to open your bag at the top and see the correct side on the inside of the bag.

Press open the side seam at the top of the bag as far as you can (if you have a pressing ham, you can get all the way down. I just pressed about 5 or 6 inches down.


Now, turn the top down again on top of itself, so that it are three layers of fabric at the top. (Does this make any sense? I don't think I'm explaining this very well. Think of rolling a cuff on a sleeve two times.)


Go back to your machine and stitch two rows, taking care to space evenly. Leave enough space between the two rows for whatever string you are going to use - and leave extra room. For example, if your cording is 1/4", leave 1/2" between the two rows.


I hope you can see in the above photo that I stitched over this area back and forth a couple of times right at the seam to reinforce the horizontal stitching that runs parallel to the top of the bag. Next, turn the bag right-side-out and use a seam ripper to open up the side seam only between the two rows you just stitched.


Add a safety pin to your cording or ribbon and thread it through this opening (the casing) and back around to the other side. Knot the ends or tie them together.


Press side seams and voila! You're done! Now you can enjoy your bread bags. Hopefully, for many years to come. Since I used a tablecloth instead of a hand towel, I was able to make two loaf size bags and a square artisan bread bag. 


Please feel free to email me if you are having trouble with this project and I would be glad to try and help you. Or perhaps a seamstress friend can do a better job explaining it than me! 

Let me know if you make some bread bags. I'd love to see pictures. Amber, a long time friend and fellow blogger, already got on this project. Be sure to see her bread bag and reorganized pantry at More Than Rubies.

May God continually fill your bags abundantly with bread!


LinkWithin

Related Posts with Thumbnails